


In our previous article, we learned how to Automate Deployment With Travis CI. In this section, we will learn how to install and configure PostgreSQL, replacing the Django's default SQLite database.
Django has support for multiple databases, which makes it easier to build a back-end database and logic without having users directly interact with the database itself.
We are going to start by making some changes to our Docker Compose File. So let's get started and create our database service. Open your project and the docker-compose.yml file.
Creating a database service in our docker-compose.yml file.
Let's start, by adding a new service called
dbusingpostgres:10-alpineimage as shown below.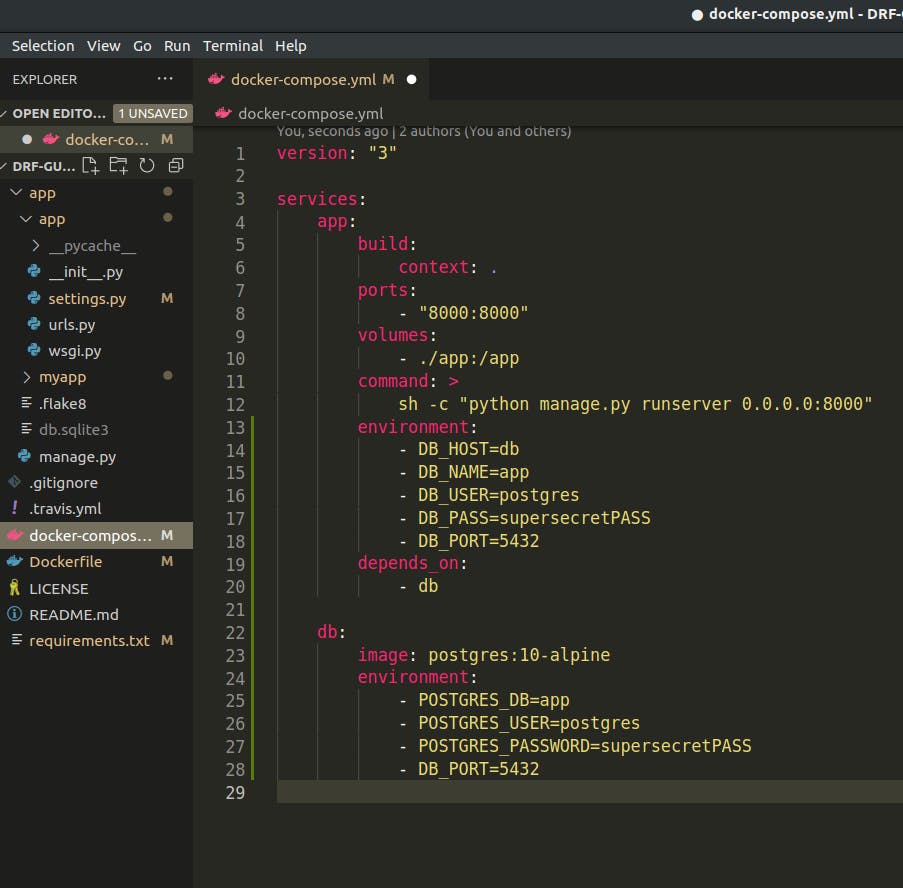
NOTE: Do not commit any secret credentials in a live environment, because it's an insecure way, anyone can see your authentication credentials and access your database. Create a new file.envin your root folder and add all your secret credentials to that. Also add.envto your.gitignore.We have modified our app service to use our
dbservice usingdepends_oni.e. our app service will depend on thedbservice. This means thedbwillstart beforethe app service and "db" will be available via a network when we use thehost_name"db". So that's how you set up docker-compose.Add Postgres Support To Dockerfile.
Open our
requirements.txtfile and add requirements as shown below. The package recommended by Django to communicate with Django and Postgress is calledpyscopg2.psycopg2>=2.7.5,<2.8.0If we try to build this now, it wouldn't work because it requires some dependencies to install this package on any system.
So, let's head over to the Dockerfile and add our dependencies as shown below.
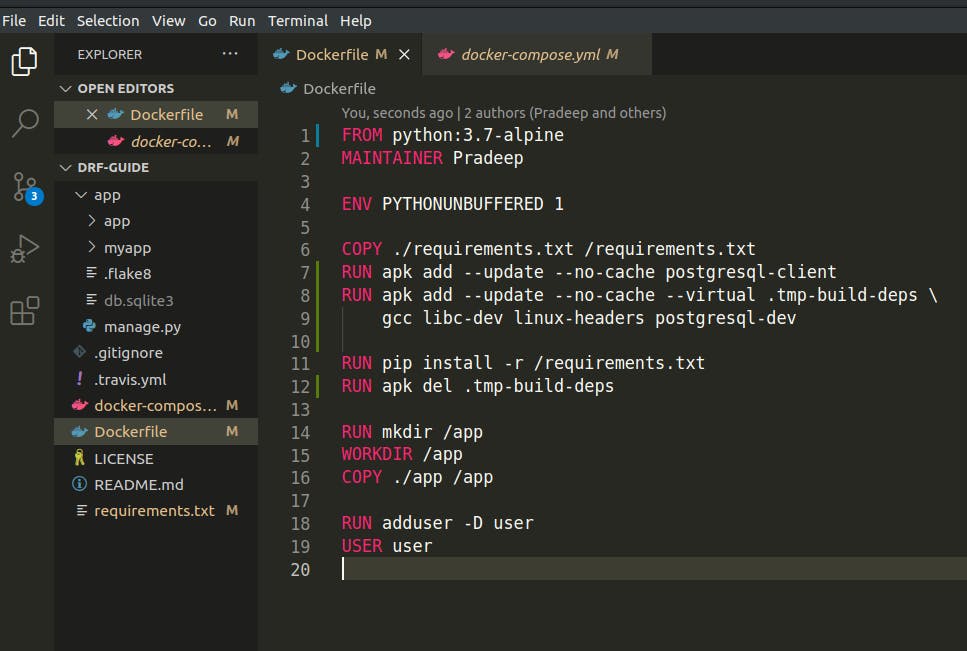
RUN apk add --update --no-cache postgresql-client - What this does is, It uses a package manager that comes with Alpine i.e
apkandadda package and--updatethe registry before we add it.--no-cachemeans don't install the registry index on our docker file. This minimizes the number of extra files and packages that are included in our Docker Container.RUN apk add --update --no-cache --virtual .tmp-build-deps \ gcc libc-dev linux-headers postgresql-dev - Installs temporary packages that need to be installed on the system while we run our requirements and then we can remove them once the requirements are installed. This makes sure that we don't have any extra dependencies in our Dockerfile unless they are necessary.
RUN apk del .tmp-build-deps - Deletes the temporary requirement i.e alias
tmp-build-deps
Building Our Docker Image.
Once you complete the above 2 steps, Head over to the terminal and execute the command ==> docker-compose build
deep@Latitude-5590:~/Desktop/DRF/DRF-Guide$ docker-compose build
db uses an image, skipping
Building app
Step 1/13 : FROM python:3.7-alpine
3.7-alpine: Pulling from library/python
a0d0a0d46f8b: Already exists
c11246b421be: Already exists
c5f7759615a9: Pull complete
Step 13/13 : USER user
.
.
.
.
---> Running in 7635f7d2338b
Removing intermediate container 7635f7d2338b
---> 07e1647c95ac
Successfully built 07e1647c95ac
Successfully tagged drf-guide_app:latest
That's how you configure the Dockerfile to support Postgres Client.
Configure Database in Django Project.
Now we'll configure our Django Project to use the
Postgresdatabase. Head over to thesettings.pyfile within our app. Locate theDATABASESconfiguration and remove the defaultsqlite3configuration and replace it with the following configuration.DATABASES = { 'default': { 'ENGINE': 'django.db.backends.postgresql', 'HOST': os.environ.get('DB_HOST'), 'NAME': os.environ.get('DB_NAME'), 'USER': os.environ.get('DB_USER'), 'PASSWORD': os.environ.get('DB_PASS'), } }Test Database Connection & Unit Tests.
So why test database connection ?
=> The reason for this is, Sometimes while using Postgres with docker-compose in a Django app. The Django app fails to start due to a database error. This is because once the Postgres service is started some setup tasks need to be done by Postgres before it is ready to accept connections. So what this means is our Django app will try to connect to the Postgres Database, before the database is ready to accept the connection, Therefore it will fail with an exception and you need to restart the app.
So how to solve or improve our app reliability ?
=> To resolve or improve the application reliability we will add a management helper command. This will ensure that our database is up and ready to accept the connections before we try and access the connections.
So let's go ahead and write our unit tests to test DB connections. Go to
tests.pyfile in your app and create a unit test as follow.from unittest.mock import patch from django.core.management import call_command from django.db.utils import OperationalError from django.test import TestCase class CommandTests(TestCase): def test_wait_for_db_ready(self): """ Test waiting for db when db is available """ with patch('django.db.utils.ConnectionHandler.__getitem__') as getitem: getitem.return_value = True call_command('wait_for_db') self.assertEqual(getitem.call_count, 1) @patch('time.sleep', return_value=True) def test_wait_for_db(self, ts): """ Test waiting for db.""" with patch('django.db.utils.ConnectionHandler.__getitem__') as getitem: getitem.side_effect = [OperationalError] * 5 + [True] call_command('wait_for_db') self.assertEqual(getitem.call_count, 6)Now let's go ahead and run our tests. Make sure they fail as we haven't written "wait_for_db" management command.
deep@Latitude-5590:~/Desktop/DRF/DRF-Guide$ docker-compose run app sh -c "python manage.py test && flake8"
Starting drf-guide_db_1 ... done
Creating test database for alias 'default'...
System check identified no issues (0 silenced).
EE
======================================================================
ERROR: test_wait_for_db (myapp.tests.CommandTests)
Test waiting for db.
----------------------------------------------------------------------
Traceback (most recent call last):
File "/usr/local/lib/python3.7/site-packages/django/core/management/__init__.py", line 102, in call_command
   app_name = get_commands()[command_name]
KeyError: 'wait_for_db'
During handling of the above exception, another exception occurred:
Traceback (most recent call last):
File "/usr/local/lib/python3.7/unittest/mock.py", line 1256, in patched
   return func(*args, **keywords)
File "/app/myapp/tests.py", line 22, in test_wait_for_db
   call_command('wait_for_db')
File "/usr/local/lib/python3.7/site-packages/django/core/management/__init__.py", line 104, in call_command
   raise CommandError("Unknown command: %r" % command_name)
django.core.management.base.CommandError: Unknown command: 'wait_for_db'
----------------------------------------------------------------------
Ran 2 tests in 0.004s

FAILED (errors=2)
Destroying test database for alias 'default'...
Now we can go ahead and create
wait_for_dbmanagement command. For this, Create a new directory calledmanagementin our app directory. Inside management create a new directory namedcommands. Inside command create__init__.pyfile and add ourwait_for_db.pyfile i.emyapp/management/commands/wait_for_db.py & __init__.pyas shown below.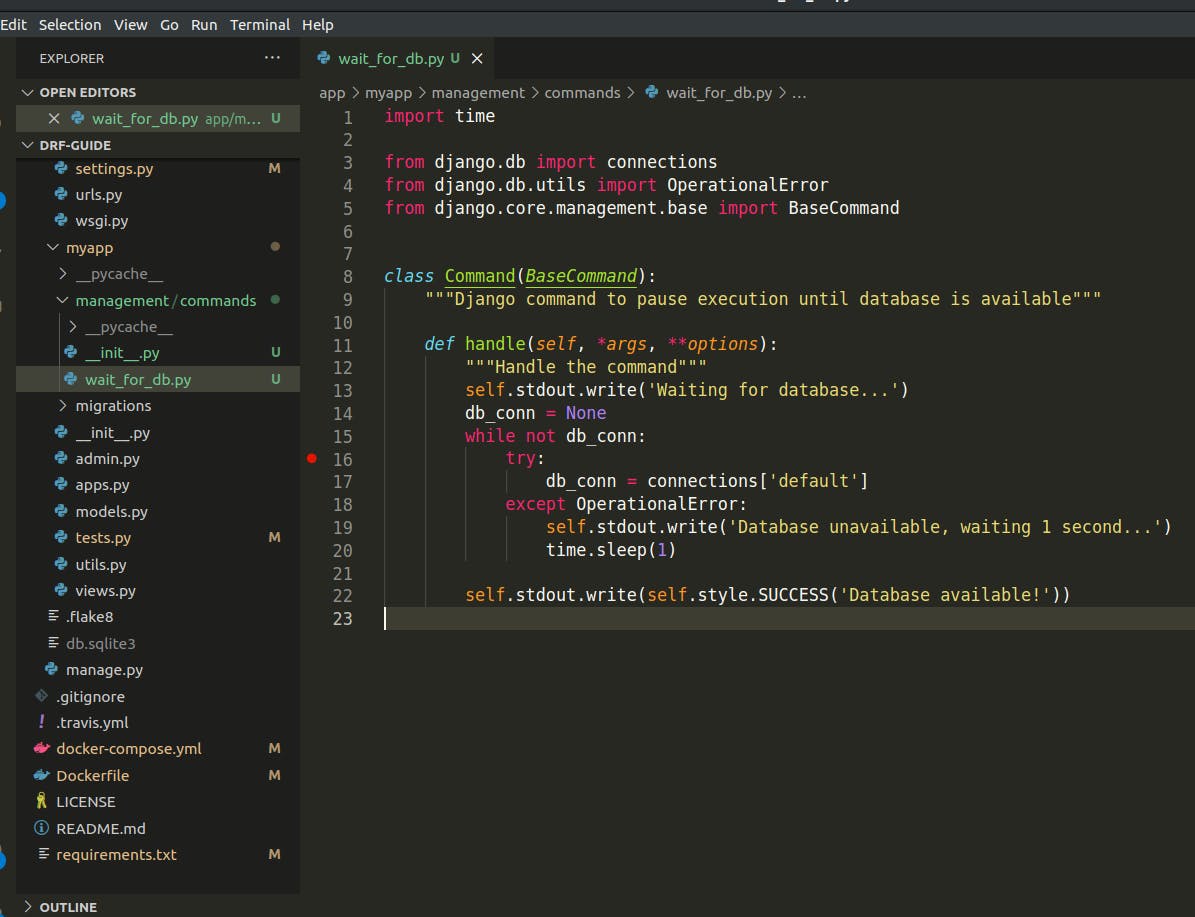
Okay so let's go back to our unit tests and we should see them pass.
deep@Latitude-5590:~/Desktop/DRF/DRF-Guide$ docker-compose run app sh -c "python manage.py test && flake8"
Starting drf-guide_db_1 ... done
Creating test database for alias 'default'...
System check identified no issues (0 silenced).
Waiting for database...
Database unavailable, waiting 1 second...
Database unavailable, waiting 1 second...
Database unavailable, waiting 1 second...
Database unavailable, waiting 1 second...
Database unavailable, waiting 1 second...
Database available!
.Waiting for database...
Database available!
.
----------------------------------------------------------------------
Ran 2 tests in 0.004s

OK
Destroying test database for alias 'default'...
So that's how you can make sure our database is available using Unit Tests.
Configure docker-compose to use "wait_for_db" management command.
Now we'll configure our
docker-compose.ymlfile to use thiswait_for_dbcommand before it starts our Django app. Updatecommandline in our docker-compose file ascommand: > sh -c "python manage.py wait_for_db && python manage.py runserver 0.0.0.0:8000"So this will wait for the database connection, Once the connection is available it will start our server.
Creating A Super User & Testing Our App.
Head back to your terminal and create a
Super Useras follows.deep@Latitude-5590:~/Desktop/DRF/DRF-Guide$ docker-compose run app sh -c "python manage.py createsuperuser" Starting drf-guide_db_1 ... done Username (leave blank to use 'user'): pradeep Email address: pradeeep765@gmail.com Password: Password (again): Superuser created successfully.Now let's run our Django app by executing docker-compose up and test our PostgreSQL Integration. Once our server is up and running, go to your favourite browser and visit
http://localhost:8000/admin/. This will open Django's default Admin page and you can try logging in with your superuser credentials.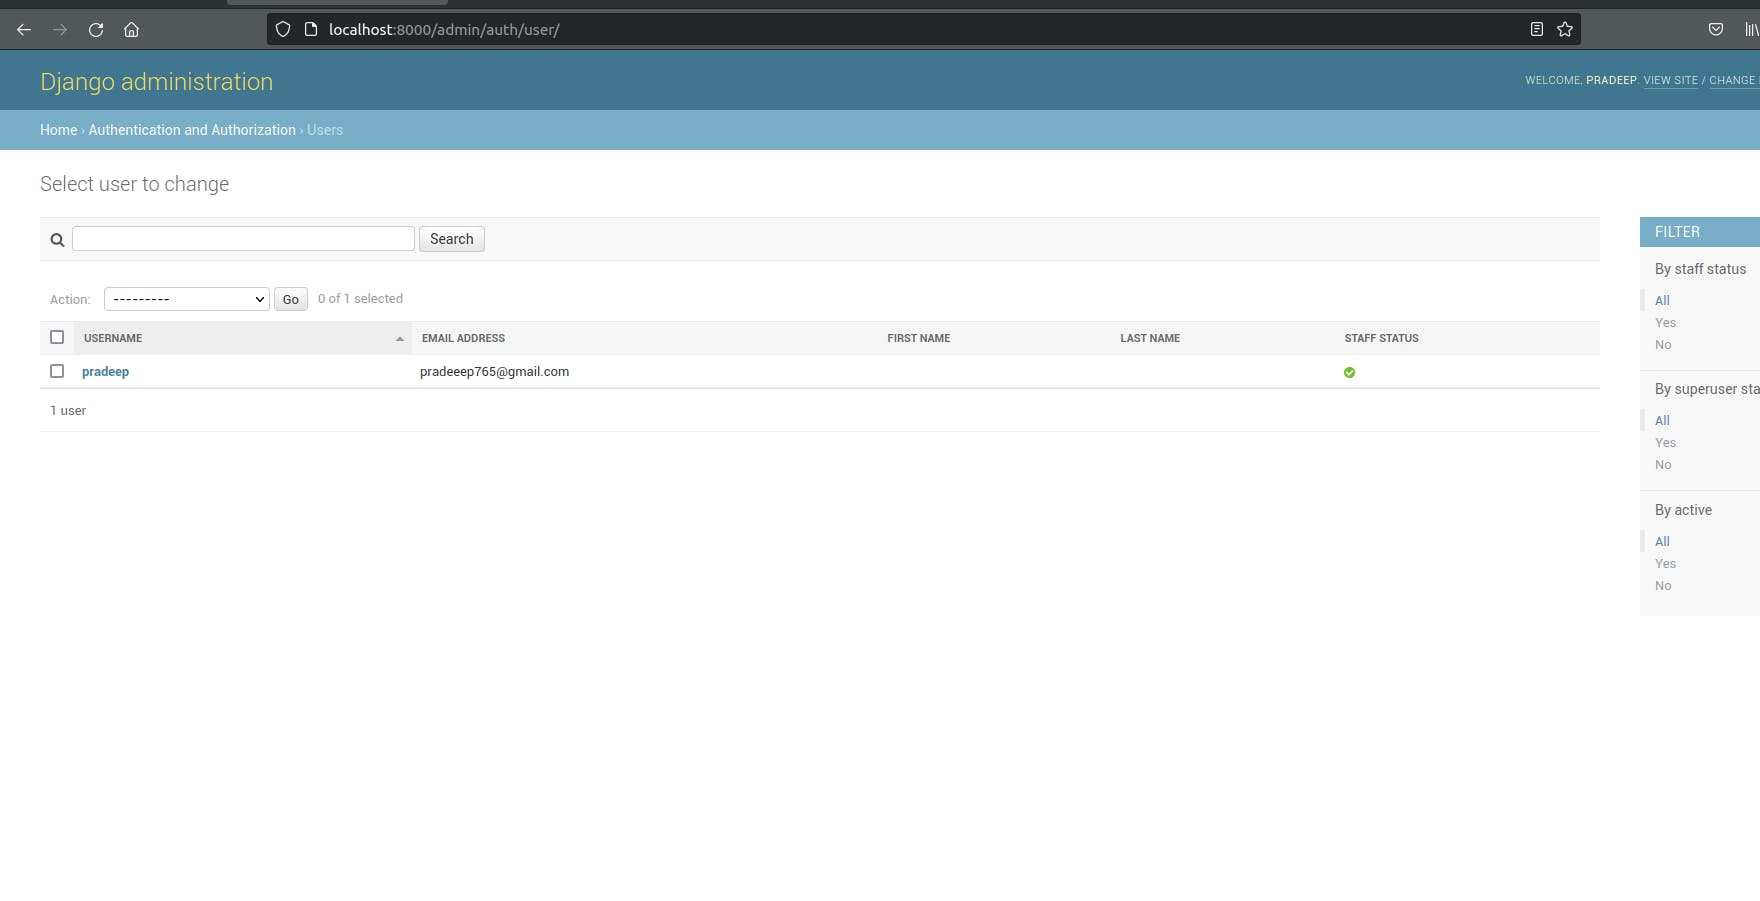
Connect To PostgreSQL Database via Shell.
Once our server is up & running, Open a new terminal and execute the command
docker exec -it drf-guide_db_1 psql -W app postgresas followsdeep@Latitude-5590:~/Desktop/DRF/DRF-Guide$ docker exec -it drf-guide_db_1 psql -W app postgres Password for user postgres: psql (10.18) Type "help" for help. # Connection Info app=# \conninfo You are connected to database "app" as user "postgres" via socket in "/var/run/postgresql" at port "5432". # See DB Tables app=# \dt List of relations Schema | Name | Type | Owner --------+----------------------------+-------+---------- public | auth_group | table | postgres public | auth_group_permissions | table | postgres public | auth_permission | table | postgres public | auth_user | table | postgres public | auth_user_groups | table | postgres public | auth_user_user_permissions | table | postgres public | django_admin_log | table | postgres public | django_content_type | table | postgres public | django_migrations | table | postgres public | django_session | table | postgres (10 rows) # Check User Details. app=# select * from auth_user; id | password | last_login | is_superuser | username | first_name | last_name | email | is_staff | is_active | date_joined ----+--------------------------------------------------------------------------------+-------------------------------+--------------+----------+------------+-----------+-----------------------+----------+-----------+------------------------------- 1 | pbkdf2_sha256$120000$sduGWm3jkPu7$+HJ27dILE5zOngxBTsEFoZPnaOlhHPjLxcr96LYdVnI= | 2021-10-31 07:26:37.363078+00 | t | pradeep | | | pradeeep765@gmail.com | t | t | 2021-10-31 07:25:47.131822+00 (1 row)So that's all we have to do to set up our Postgres Database.
If you found this article helpful, do well to leave your feedback in the comment section and share this resource.
Let me know if you want a learn How To Integrate Mongo DB With Django.
Thank you for reading and follow me for more.